Media Production by Ron Reichel
The brakes on your car are the most important system it has. They also seem to be the most complex given how much shops charge to fix them. Good brakes are just expected, as they are what keep you from accidentally meeting the person in the car in front of you. Thankfully, after decades of refinement, car brakes have become simple in function, and easy to service for the average DIY’er.
Common brake job mistakes
I did my first brake job when I was 16. Under the watchful eye of my boss, he made sure I didn’t make the typical mistakes such as:
- Getting my greasy hands on the brake pad surfaces. Now I’m extra careful to clean my hands well before handling the new pads.
- Not cleaning the rotors. Brake rotors are machined metal that usually come from the factory with an oily coating to prevent rust. Cleaning them well with brake cleaner is a must for a great brake job.
- Not opening the brake fluid reservoir cap. The brake caliper has pistons that are pushed by the fluid from the brake master cylinder and the reservoir. When putting in new pads, you have to push the pistons back in to give you the room for the new pads. This means brake fluid goes back up the brake lines to the brake fluid reservoir. The first time I did this, the force popped off the reservoir cap and splashed some brake fluid in the engine bay. Just wipe it off right? Uh, well no. Brake fluid is very damaging to paint so cleaning it well and quickly is a must.
Signs of bad brakes
When you press the brake pedal, does any of the following happen?

- You hear a squeal, grinding, or high pitched whine? This is usually the low brake pad warning system. It’s not really a system. It’s a small metal clip that is attached to your brake pads. Your brake pads get thin after lots of use because the friction material wears away. The low brake pad warning clip then starts to come into contact with the brake rotor. That thin metal clip touching your metal brake rotors is where that high pitched squeal or whine comes from.
- Does the car pull to the left or right? This can be caused by worn or warped rotors. It can also be caused by the caliper not applying the pads evenly to the rotors. This is often because the calipers not moving correctly.
- Does the car shudder or vibrate? This can also be worn or more likely, warped rotors. Why do rotors warp? When the pads are applied to them, they generate a lot of heat to slow down your car that can weigh almost 2 tons. This heat can cause your rotors to warp especially during a panic stop or lots of brake use like when going down a long hill.
- Too soft, too firm, or spongy brake pedal. If you have to press the pedal all the way to the floor before your car stops, that’s a problem. So is a brake pedal that stops your car with barely a touch of the pedal. Also, a spongy pedal can mean a worn brake hose or air in the system.
What brake parts do I need?
- Brake pads. Ever notice the black dust on the rims of your car? That’s brake dust. It’s from the brake pads wearing against the rotors and the dust is the result. Most high performance and European cars have excellent brakes. The downside is that for the brake pads to “grab” that well, means the pads will wear faster resulting in more dust. Many replace their factory dusty brake pads with ceramic pads that work well without as much dust. The first bit of research to do is what brake pads fit your car. The easiest choice is to buy pads from the maker of your car. Then you know they will fit exactly and perform as before. If you want less dust, then a ceramic brake pad will help. If you use your car for weekend races or other high performance driving, then going with a performance brake pad may be in order. Those will have more dust than the stock ones as they will be softer to grab hard and not fade with repeated high speed braking. We will go into performance brake upgrades in a future post.
- Brake rotors. Many auto repair shops will quote you a price to redo your brakes. While many will replace your brake pads and rotors, some will only be replacing the pads. They resurface the rotors which means they take off some of the metal surface on both sides of the rotor. Given the low cost of quality replacement brake rotors, I’ve found that simply replacing the rotors rather than resurfacing the old ones works well. Why? Resurfacing a rotor means removing a thin layer of metal from both sides of the rotor to get it flat. The downside of this machining work is that the rotor is now thinner and more prone to warping. This means your brake job may not last as long as one where you replaced the rotors. Brake rotors come in various types, ones with holes, slots, etc. I’ve found the only fancy thing I want on my rotors is corrosion resistance. Having coated rotors will help keep the parts of the rotor that don’t touch the pads from rusting. It’s cosmetic for sure, but if you live where metal rusts easily without protection, it can keep your rotors from failing prematurely.
- Brake hardware. Modern brake systems (Electric cars not included as they use braking to recharge the batteries) are relatively simple things and most have the same parts. Most auto parts sell kits with all the parts you need to replace yours. If the first time you are doing your brakes is after lots of use, like 60k miles and 8 years of use, you’ll want to replace all the hardware in addition to the pads and rotors.
- Brake pad clips. These are metal clips where the “ears” of the brake pads slide back and forth in.
- Caliper pins. These are metal rods that the caliper slides on when the brakes are applied (the caliper piston pushes the pad against the rotor).
- Caliper pin boot. These are rubber boots that are ribbed so they can collapse and the brake are applied. The ribbing helps them spring back into shape when the brakes are released. These boots help keep moisture and contaminants away from the Caliper pins so they keep sliding correctly.
- Brake springs. These are thin metal wires that help hold the pads away from the rotor to prevent noise and from the pads dragging on the rotors when the brakes are engaged. On drum brakes (which are getting pretty rare to find), these retract the brake shoes from the drum.
Brake job steps
If you don’t have all the tools below, your local auto parts store usually has many of them for loan for free. In most cases, you put down a deposit (credit card), borrow the tool, and return it. They won’t charge you for using the tools.
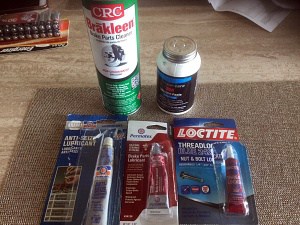
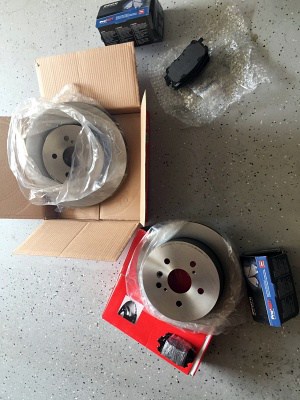
- Buy the parts you need.
- Brake pads
- Brake rotors
- Brake hardware
- Chemicals:
- Brake cleaner
- Brake caliper grease (I use silicon based grease for the caliper pins to keep them moving well).
- Anti-seize
- Thread lock
- Collect your tools:
- Jack and jack stands
- Torque wrench
- Impact sockets, socket wrench, and socket extensions
- C-clamp or large pliers (to move the caliper piston back in place) or a brake caliper tool
- Small wire brush
- Short bungee cord or thick wire
- Torque specifications for your cars lug nuts, caliper bolts, caliper pin bolts, etc.
- Jack up the car and place jack stands in the right places. If you aren’t sure, your car’s owners manual will show exactly where you can put your jack and jack stands to properly support your car. Do not work on a car using just a jack.
- Remove the tires. For example if you are doing the front, jack up the front of the car, put two jack stands underneath the car, one on each side. Keep the lug nuts in a pile as they like to grow feet and wander around. Or at least mine do.
- Remove the two bolts that hold the caliper bracket to the steering hub/knuckle. Sometimes one will be longer than the other, make sure you note which bolt went where. These are usually tight as they have threadlock on them.
- Remove the caliper pin bolts. Inspect/replace the caliper pin rubber boots. Remove the caliper pins, clean them, lube them with caliper slide paste and slide them back in place. As you can see from the pic below, the caliper pins are different color as they are different lengths. I do them one at a time so I don’t mix them up. I like 3M Silicone paste caliper pin slide grease as it won’t harden/gum up or eat the rubber caliper pin boots. The last point is key, petroleum based lube would eat up the rubber caliper pin boots allowing moisture etc. to get in there causing the pins to not move smoothly. For my car, I had to replace these rotors and pads because a stuck caliper pin caused the pads to wear unevenly and the rotors to warp. I’ve used 3M Silicon Paste on all my brake jobs for years and it’s proven to keep caliper pins moving smoothly for miles and miles.
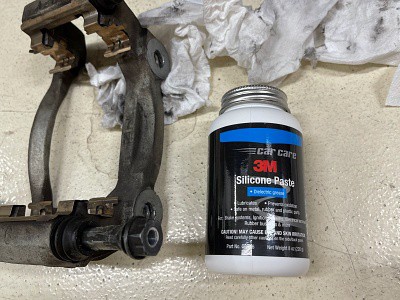
- Remove the caliper along with the pads and use a bungee cord or thick wire to tie it up. I usually tie it to the spring on the strut. The idea is to not have the weight of the caliper be held up by the brake line. They are not designed for that.
- Remove the pads and hardware such as the clips from the caliper. Spray the caliper with brake cleaner and scrub with your metal wire brush. Clean the clips and hardware (springs) if they are in good shape and you are reusing them. Otherwise install the new hardware onto the caliper.
- You’ll notice that the piston inside the caliper is extended a bit. This is because as your old pads wore down, the piston had to extend further and further. Your new pads and rotors are thicker than what you removed so you have to push the piston back in.
- Loosen your brake fluid reservoir cap. If the brake fluid in the reservoir is at the top, you may have to remove some as you go. Just monitor the brake fluid level as you are moving the caliper pistons back.
- Use an old brake pad (with the backing plate towards the caliper piston) and a clamp to slowly move the caliper piston back into the caliper. You want the top of the caliper piston to be flush with the side of the caliper. There are special tools to do this, but nothing works as easy as an old pad and a clamp.
- Add/remove brake fluid from the reservoir as needed and replace the cap.
- Remove the old rotor. The hub surface where the wheel studs are is usually covered in rust. Use your wire brush and some brake cleaner to remove all the surface corrosion. You want a flat and smooth surface so your rotor sits flat on the hub. Pro tip: Cover the hub surface with a light coat of anti-seize. This will prevent the rust from returning and will make the next brake job much easier. Permetex Copper Anti-seize works really well. I put a very light coating on the hub and the studs. This is super important if you live in a climate with high humidity or where salt is used on the roads.

- Clean the new rotor using brake cleaner. Most rotors are shipped with an oil or other coating to prevent rust during shipment. On the rear rotors, the inner area is where the parking brake may be applied so make sure to clean there too. Install the new rotor. For the rear, adjust the parking brake per your owners manual.
- Reinstall the caliper bracket to it’s mounting point with the bolts removed in step 5. Apply some threadlock and torque to the correct specification.
- Install the new pads. You can usually just slide them into place. Slide the caliper back into place. Torque the caliper pin bolts to the correct specification.
- Mount the tire and torque the lug nuts to the correct specification.
- Remove the jack and stands and pat yourself on the back.
Pro brake job tips
After doing countless brake jobs, I’ve found that anyone with basic mechanic skills and the right tools can replace the brakes on their car. With a bit of patience, you can do the job yourself. This will save you money and give you the satisfaction of doing the work yourself. Here are the top pro brake job tips that will help you get the job done right.
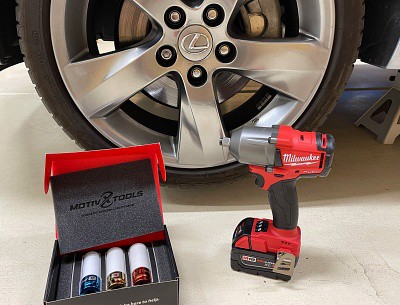
- Use impact tools. You probably have a cordless 1/4″ impact gun. One that you use for DIY jobs around the house. These are great for working on cars too. They do the same thing as an air impact gun without the hose or compressor (and the noise). Just make sure to use impact sockets and accessories. These are hardened to take the pounding that an impact gun puts out. I used to have a 25 gallon compressor, hoses, connectors, and an impact gun. My neighbors just “loved” when I fired up that compressor early in the morning as it echoed from the back of my garage. After decades of use, my compressor finally died. I realized, an electric impact driver would be about what a replacement compressor would be, and it’s way quieter. In fact, the time to set up the compressor, drag out the hose, etc. was way more than installing a battery. This Milwaukee compact 1/2″ impact driver has plenty of power with up to 600 foot pounds of torque. For reference, my lug nuts are torqued to 76 foot pounds of torque. It has 3 power levels, 1 being the lowest, 3 the highest. It also has a little LED light which I thought was a nice touch. It’s lightweight so you can use it one handed. These thin wall 1/2″ drive impact sockets have nylon covers. This means they are small enough to fit in most (if not all) lug nut holes in your rims. The nylon cover keeps the socket from grinding the paint off your rims. While these are not robust enough for a shop to use (where it would be in use all day, every day), they work perfectly for us weekend warriors.
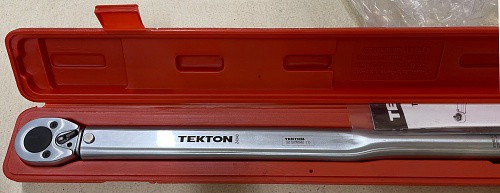
- Torque wrench. One of the most common reasons brake rotors warp is that the lug nuts aren’t properly torqued correctly. When you put back on your lug nuts, do you tighten them in a circle? Like going clockwise or counter clockwise? This is how uneven pressure is applied to the rotor which is right behind your wheel and tire. The proper way is the tighten them opposite of each other. For example, tighten the lug nut at 1:00 o’clock, then the lug nut at 7:00 o’clock, then the one at 11:00 o’clock, then the one at 4:00 o’clock etc. This will evenly apply the pressure. Also, make sure you looked in your car’s owners manual for what the torque specifications are for your cars lug nuts. My personal favorite is my Tekton torque wrench. This model is a 1/2″ drive that goes from 25 to 250 foot pounds of torque. They have 4 models that have different drive sizes and torque ranges. I found this to be what I needed. The high torque rating was needed when I replaced my wheel bearings and the hub bolt is torqued to 210 foot pounds.
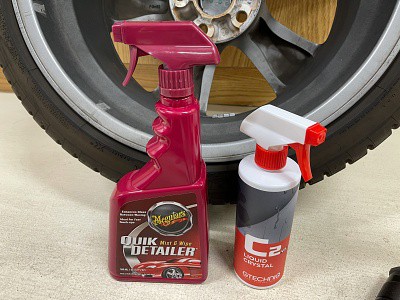
- Clean the inside of your rims. Yes, the inside. Since you have the wheels off anyway, clean and protect them to make washing your car easier in the future. I use Mequiars Quik Detailer to remove the brake dust and road grime. Then I used GTechniq Liquid Crystal (C2) to protect them. GTechniq’s Liquid Crystal is a ceramic coating which lasts 6 months to a year on painted surfaces. On the inside of your wheels which rarely get sun or rain, it lasts much longer. The benefits are that the brake dust and road grime don’t cling as much and the dirt that does, it easier to just wash off with a hose. This adds a bit of shine from a place on your car that most don’t.
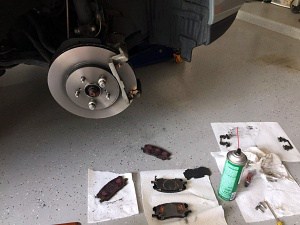
- If you are doing the front brakes, turn the steering wheel in the direction of the side you are doing. For example, if you are doing the passenger side front brake, turn the steering wheel to the right. This works if your calipers are on the front of your wheel like pictured below. If your caliper is on the rear of the wheel, then the opposite is true. You want the caliper to be pointed outwards as the bolts you need to get to are behind the caliper. In car terms, left and right are based on the drivers point of view, sitting in the driver’s seat. In the picture below, I’ve used a few lug nuts to hold the new rotor in place while I bolted on the caliper bracket.
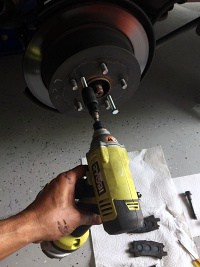
- Use a bolt to remove a stuck rotor. Most rotors rust or get stuck onto the hub. Thankfully, most rotors have small screw holes to help remove them. You can find the holes that have bolt threads in them on your rotors. Make sure to use the correct size bolt and thread. Using your impact driver will make short work of this.
- Put a lug nut or two to hold the new rotor in place. Once you’ve put on your new rotor, use one or two lug nuts to hold it in place while you install the brake pads and caliper (see image above)
- Clean your new rotors. Rotors are precision ground to exacting standards. This means the surface that the brake pads touch are bare metal. The makers put oil or other materials on them to prevent the rotors from rusting. I found it took 3 cleanings to get all the protective oil off my new rotors. CRC Brake cleaner does a great job and one can is more than enough per axle. I used paper towels to clean the oils off. See the picture below, that oil on the paper towel is from the 2nd cleaning.

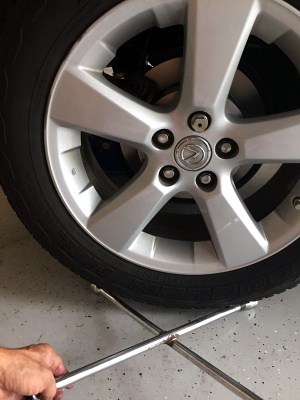
- Use a wrench to lift the tire back onto the wheel studs.
- Break in the brake pads and rotors. This is called “bedding” the pads. Many manufacturers (like the Akebono pads shown here) don’t require bedding. For more information on this, read this article on how and why bedding your new brakes is a good thing to do.
Hopefully these tips will help you through your first brake job.

